1. 什么是单元测试
单元测试是针对程序的最小单元来进行正确性检验的测试工作。程序单元是应用的最小可测试部件。一个单元可能是单个程序、类、对象、方法等。 ——维基百科
2. 为什么要写单元测试
2.1 大家不愿意写单元测试的常见原因
跳出舒适区,一份高质量的代码从写单元测试开始。
2.2 单元测试的重要性
**帮助理解需求:**单元测试应该反映 Use Case,把被测单元当成黑盒测试其外部行为
**提高实现质量:**单元测试不保证程序做正确的事,但能帮助保证程序正确地做事,从而提高实现质量
**反馈速度快:**单元测试提供快速反馈,把 Bug 消灭在开发阶段
**利于重构:**由于有单元测试作为回归测试用例,有助于预防在重构过程中引入 Bug
**文档作用:**单元测试提供了被测单元的使用场景,起到了使用文档的作用
**对设计的反馈:**一个模块很难进行单元测试通常是不良设计的信号,单元测试可以反过来指导设计出高内聚、低耦合的模块
2.3 举例
3. 单元测试测什么
3.1 输入测试
3.1.1 参数类型测试
输入是否为期望的类型,例如是否为整型或者列表中的元素是否为整型
复制 import pytest
def add(a, b):
if not (isinstance(a, (int, float)) and isinstance(b, (int, float))):
raise ValueError('input should be numeric')
return a + b
def test_add():
with pytest.raises(ValueError, 'input should be numeric'):
add(1, '2')
add(1, 2)
3.1.2 非法参数测试
测试输入是否合法,例如要求除数不能为 0
复制 import pytest
def divide(a, b):
if b == 0:
raise ZeroDivisionError('divisor b cannot be 0')
return a / b
def test_divide():
with pytest.raises(ZeroDivisionError, 'divisor b cannot be 0'):
divide(1, 0)
divide(1, 2)
3.1.3 边界测试
测试输入是否符合上下界
复制 import pytest
def add_age(a, b):
if a <=0 or b <= 0:
raise Value('age should be greater than 0')
def test_add_age():
with pytest.raises(ZeroDivisionError, 'divisor b cannot be 0'):
add_age(0, 1)
with pytest.raises(ZeroDivisionError, 'divisor b cannot be 0'):
add_age(1, 0)
with pytest.raises(ZeroDivisionError, 'divisor b cannot be 0'):
add_age(0, 0)
assert add_age(1, 1) == 2
3.1.4 全局变量测试
测试全局变量的值是否正确
复制 import pytest
a = 0
def get_a():
return a
def incre_a():
a += 1
return a
def test_global_var():
# test a
assert get_a() == 0
assert incre_a() == 1
assert get_a() == 1
assert incre_a() == 2
assert get_a() == 2
3.1.5 生成器测试
测试生成器的返回值是否符合期望
复制 import pytest
def iter_list(a):
for i in a:
yield i
def test_iter_list():
gen = iter_list([0, 1, 2])
assert next(gen) == 0
assert next(gen) == 1
assert next(gen) == 2
with pytest.raises(StopIteration):
next(gen)
3.2 输出测试
测试输出是否符合预期
复制 import pytest
def add(a, b):
if not (isinstance(a, (int, float)) and isinstance(b, (int, float))):
raise ValueError('input should be numeric')
return a + b
def test_add():
assert add(1, 2) == 3
assert add(-1, 2) == 1
assert add(-1, 1) == 0
3.3 控制流测试
参考 https://testerhome.com/topics/19991
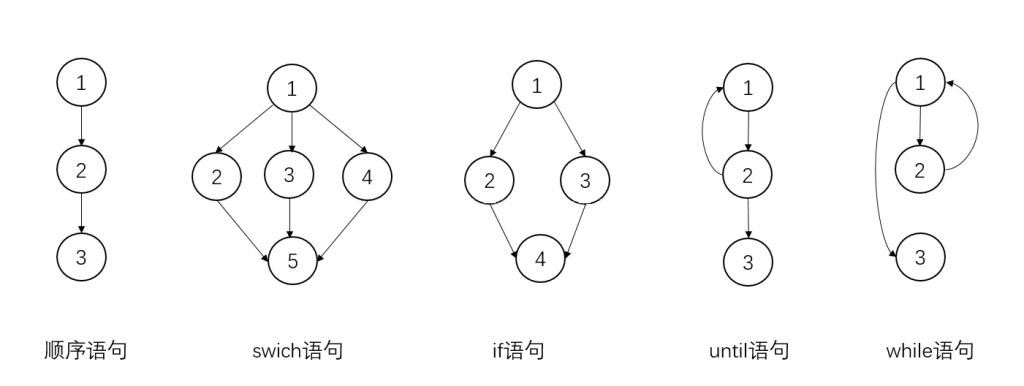
控制流测试是一种在考虑测试对象的控制流情况下导出测试用例的测试方法,并且借助于控制流图(Control Flow Graph)能评估测试的完整性(覆盖率)。
3.3.1 控制流图
控制流图(Control Flow Graph,CFG)也叫控制流程图,是一个过程或程序的抽象表现,是用在编译器中的一个抽象数据结构,由编译器在内部维护,代表了一个程序执行过程中会遍历到的所有路径。 它用图的形式表示一个过程内所有基本块执行的可能流向, 也能反映一个过程的实时执行过程。
一个不带分支和汇总的语句序列可以简单地用一个节点来表示
下图是控制流图的几种结构,大多数程序可以由以下几种结构组合而成。
3.3.2 主要测试方法
围绕下面的例子介绍控制流测试的主要测试方法
复制 def dummpy_func(A, B, C, D):
if A and B:
# do something here
if C or D:
# do something here
3.3.3 语句覆盖
在控制流中每条可执行的语句至少被执行一次。
语句覆盖率 = 已执行的语句数目 / 所有语句的总数目 * 100%构造测试用例
A = True, B = True, C = True, D = True
上述的测试用例可使语句覆盖率 100 %
3.3.4 分支覆盖(判定覆盖)
在控制流图内的每一条边都至少被执行一次。
分支覆盖率 = 已执行的分支数目 / 分支总数目 * 100%构造测试用例
A = True, B = True, C = True, D = False
A = True, B = False, C = False, D = False
上述的测试用例可使分支覆盖率 100 %
3.3.5 条件覆盖
每一个条件的可能取值都应该被测试到。
条件覆盖率 = 已执行的判定结果 / 所有的判定结果总数 * 100%构造测试用例(即 A, B, C, D 的值至少都取过 True 和 False)
A = True, B = True, C = True, D = True
A = False, B = False, C = False, D = False
上述的测试用例可使条件覆盖率 100 %
3.3.6 路径覆盖
在控制流图内的每一个分支序列(路径)都应该执行一次。
在具有 k 个连续的分支时,则会有 2**k 种不同的路径
构造测试用例(每个分支的值至少取过 True 和 False)
A = True, B = True, C = True, D = True
A = False, B = False, C = False, D = False
A = True, B = True, C = False, D = False
A = False, B = False, C = True, D = True
上述的测试用例可使路径覆盖率 100 %
4. 单元测试框架介绍
本节代码示例地址:https://github.com/zhouzaida/unittest-tutorial
pytest 是一个测试框架,简化编写易读以及可扩展的测试流程。测试代码和代码一样,也要求是可读的。使用 pytest 构建测试非常简单,我们可以在几分钟内就可以为应用程序或库进行小型单元测试或复杂的功能测试。
4.1.1 安装
4.1.2 入门用法
复制 # pytest/example1.py
def func(x):
return x + 1
def test_answer():
assert func(3) == 4
使用下面的命令即可启动测试
复制 # pytest/example2.py
import pytest
class Operation:
def add(self, a, b):
return a + b
def sub(self, a, b):
return a - b
def mul(self, a, b):
return a * b
def div(self, a, b):
return a / b
class TestOperation:
def __init__(self):
self.operation = Operation()
def test_add(self):
assert self.operation.add(1, 2) == 3
def test_sub(self):
assert self.operation.sub(1, 2) == -1
def test_mul(self):
assert self.operation.mul(1, 2) == 2
def test_div(self):
assert self.operation.mul(1, 2) == 0.5
4.1.3 进阶用法
fixture
fixture 为单元测试提供了预定义的、可信赖的以及上下文一致的测试环境。fixture 可以包含一些环境的设置,例如连接数据库或者关闭数据库,也可以包含一些多个单元测试共享的测试数据。
两个测试用例使用同一个测试数据
复制 # 参考 https://realpython.com/pytest-python-testing/
import pytest
@pytest.fixture
def example_people_data():
return [
{
"given_name": "Alfonsa",
"family_name": "Ruiz",
"title": "Senior Software Engineer",
},
{
"given_name": "Sayid",
"family_name": "Khan",
"title": "Project Manager",
},
]
def test_format_data_for_display(example_people_data):
assert format_data_for_display(example_people_data) == [
"Alfonsa Ruiz: Senior Software Engineer",
"Sayid Khan: Project Manager",
]
def test_format_data_for_excel(example_people_data):
assert format_data_for_excel(example_people_data) == """given,family,title
Alfonsa,Ruiz,Senior Software Engineer
Sayid,Khan,Project Manager
"""
Pytest 提供了很多内置的 fixture,可以简化测试用例的重复代码。tmp_path 是其中的一个 fixture(更多 fixture 见 Pytest API and builtin fixtures ),为测试用例提供唯一的临时目录,测试完成后该临时目录会被自动清理。
复制 import tempfile
import os
def test_create_file():
with tempfile.TemporaryDirectory() as tmpdir:
sub_dir = os.path.join(tmpdir, 'sub')
os.mkdir(sub_dir)
filepath = os.path.join(sub_dir, 'hello.txt')
...
复制 def test_create_file(tmp_path):
d = tmp_path / "sub"
d.mkdir()
p = d / "hello.txt"
...
mmcv 的使用场景
复制 # https://github.com/open-mmlab/mmcv/blob/1216e5fe7fbff3299d94f5e153cba74ce854f567/tests/test_runner/test_hooks.py#L1107
def test_dvclive_hook(tmp_path):
sys.modules['dvclive'] = MagicMock()
runner = _build_demo_runner()
(tmp_path / 'dvclive').mkdir()
hook = DvcliveLoggerHook(str(tmp_path / 'dvclive'))
loader = DataLoader(torch.ones((5, 2)))
runner.register_hook(hook)
runner.run([loader, loader], [('train', 1), ('val', 1)])
shutil.rmtree(runner.work_dir)
hook.dvclive.init.assert_called_with(str(tmp_path / 'dvclive'))
hook.dvclive.log.assert_called_with('momentum', 0.95, step=6)
hook.dvclive.log.assert_any_call('learning_rate', 0.02, step=6)
mark
parametrize 使用 pytest.mark.parametrize 去除冗余的代码
复制 import pytest
def dummy_func(a):
if a < 10:
return a + 1
elif a < 20:
return a + 2
elif a < 30:
return a + 3
else:
return a + 4
def test_dummy_func():
assert dummy_func(5) == 6
assert dummy_func(12) == 14
assert dummy_func(24) == 27
assert dummy_func(30) == 34
复制 import pytest
def dummy_func(a):
if a < 10:
return a + 1
elif a < 20:
return a + 2
elif a < 30:
return a + 3
else:
return a + 4
@pytest.mark.parametrize("test_input,expected", [(5, 6), (12, 14), (24, 27), (30, 34)])
def test_dummy_func(test_input, expected):
assert dummy_func(test_input) == expected
跳过测试用例
无条件跳过测试用例
复制 @pytest.mark.skip(reason="no way of currently testing this")
def test_the_unknown():
...
如果想在运行时才判断是否跳过,则可以使用 pytest.skip
复制 def test_function():
if not valid_config():
pytest.skip("unsupported configuration")
有条件跳过测试用例
复制 import sys
@pytest.mark.skipif(sys.version_info < (3, 7), reason="requires python3.7 or higher")
def test_function():
...
下面是 MMCV 中的一个例子,有些算子的实现只有 GPU 版本,如果在只有 CPU 的环境,那么测试 GPU 版本的算子会报错,所以需要跳过没有 CPU 实现的算子
复制 # https://github.com/open-mmlab/mmcv/blob/f9be3bc3336f00138b876de002477864810c5b29/tests/test_ops/test_ball_query.py#L7
@pytest.mark.skipif(
not torch.cuda.is_available(), reason='requires CUDA support')
def test_ball_query():
pass
assert
使用断言判断代码是否抛出期望的异常
复制 import pytest
def divide(a, b):
if b == 0:
raise ZeroDivisionError('divisor cannot be 0')
return a / b
def test_divide():
with pytest.raises(ZeroDivisionError, match='divisor cannot be 0'):
divide(1, 0)
unittest
模块提供了一系列创建和运行测试的工具。
4.2.1 基本用法
这是一段简短的代码,来测试三种字符串方法:
复制 # unittest/example1.py
import unittest
class TestStringMethods(unittest.TestCase):
def test_upper(self):
self.assertEqual('foo'.upper(), 'FOO')
def test_isupper(self):
self.assertTrue('FOO'.isupper())
self.assertFalse('Foo'.isupper())
def test_split(self):
s = 'hello world'
self.assertEqual(s.split(), ['hello', 'world'])
# check that s.split fails when the separator is not a string
with self.assertRaises(TypeError):
s.split(2)
if __name__ == '__main__':
unittest.main()
继承 unittest.TestCase
就创建了一个测试样例。上述三个独立的测试是三个类的方法,这些方法的命名都以 test
开头。 这个命名约定告诉测试运行者类的哪些方法表示测试。每个测试的关键是:调用 assertEqual()
来检查预期的输出; 调用 assertTrue()
或 assertFalse()
来验证一个条件;调用 assertRaises()
来验证抛出了一个特定的异常。使用这些方法而不是 assert
语句是为了让测试运行者能聚合所有的测试结果并产生结果报告。通过 setUp()
和 tearDown()
方法,可以设置测试开始前与完成后需要执行的指令。 在 组织你的测试代码 中,对此有更为详细的描述。最后的代码块中,演示了运行测试的一个简单的方法。 unittest.main()
提供了一个测试脚本的命令行接口。当在命令行运行该测试脚本时
复制 python unittest/example1.py
上文的脚本生成如以下格式的输出:
复制 ...
----------------------------------------------------------------------
Ran 3 tests in 0.000s
OK
在调用测试脚本时添加 -v
参数使 unittest.main()
显示更为详细的信息,生成如以下形式的输出:
复制 test_isupper (__main__.TestStringMethods) ... ok
test_split (__main__.TestStringMethods) ... ok
test_upper (__main__.TestStringMethods) ... ok
----------------------------------------------------------------------
Ran 3 tests in 0.001s
OK
以上例子演示了 unittest
中最常用的、足够满足许多日常测试需求的特性。当然我们也可以使用以下的命令运行测试
复制 # 加 -v 输出更多细节
python -m unittest example1 -v
python -m unittest example1.TestStringMethods -v
python -m unittest example1.TestStringMethods.test_upper -v
python -m unittest example1.py -v
4.2.2 组织测试结构
https://asciinema.org/a/435174
setUp()
和tearDown()
在单个测例被测试前后调用,前者在测试前,后者在测试后。setUpClass()
和tearDownClass()
在整个测试类中只会被调用一次,前者在类被测试前调用,后者在类被测试后调用。
复制 # unittest/example2.py
import unittest
class MyTestCase(unittest.TestCase):
@classmethod
def setUpClass(cls):
print('setUpClass() was called.')
@classmethod
def tearDownClass(cls):
print('tearDownClass was called.')
def setUp(self):
print('setUp() was called.')
def tearDown(self):
print('tearDown() was called.')
def test_something1(self):
print('test something1 here')
def test_something2(self):
print('test something2 here')
if __name__ == '__main__':
unittest.main()
4.2.3 组织测试顺序
https://asciinema.org/a/435177
测试类中的测试方法被测试的默认顺序按照方法名根据字符序来调用的,但我们可以通过 TextSuite
来定制测试方法的测试顺序
默认顺序
复制 # unittest/example3.py
import unittest
class MyTestCase(unittest.TestCase):
def test_something2(self):
print('test something2 here')
def test_something1(self):
print('test something1 here')
if __name__ == '__main__':
unittest.main()
定制顺序
复制 # unittest/example4.py
import unittest
class MyTestCase(unittest.TestCase):
def test_something2(self):
print('test something2 here')
def test_something1(self):
print('test something1 here')
if __name__ == '__main__':
runner = unittest.TextTestRunner()
suite = unittest.TestSuite()
suite.addTest(MyTestCase('test_something2'))
suite.addTest(MyTestCase('test_something1'))
runner.run(suite)
需要使用python example4.py
启动测试,因为是在 __main__ 中重新组织了测试用例的调用顺序,而使用python -m unittest example
,该启动方式不会执行 __main__ 中的语句。
4.2.4 跳过测例
https://asciinema.org/a/435179
Unittest 支持跳过单个测试用例或者整个测试类
无条件跳过被装饰的用例
@unittest.skipIf(condition, reason)
如果 condition 为 True,则跳过被装饰的用例
@unittest.skipUnless(condition, reason)
如果 condition 为 False,则跳过被装饰的用例
@unittest.expectedFailure
被装饰的方法如果没通过测试或者报错,则认为是成功的一次测试
unittest.SkipTest(reason)
跳过测试用例
复制 # unittest/example5.py
import unittest
class MyTestCase(unittest.TestCase):
@unittest.skip("demonstrating skipping")
def test_nothing(self):
self.fail("shouldn't happen")
@unittest.skipIf(mylib.__version__ < (1, 3),
"not supported in this library version")
def test_format(self):
# Tests that work for only a certain version of the library.
pass
@unittest.skipUnless(sys.platform.startswith("win"), "requires Windows")
def test_windows_support(self):
# windows specific testing code
pass
@unittest.expectedFailure
def test_fail(self):
self.assertEqual(1, 0, "broken")
def test_maybe_skipped(self):
if not external_resource_available():
self.skipTest("external resource not available")
# test code that depends on the external resource
pass
4.2.5 常用断言
4.3.1 mock 是什么
模拟对象(mock object)是以可控的方式模拟真实对象(real object)行为的假对象。而之所以使用 模拟对象,是因为有时真实对象的行为是不确定的(例如真实对象是 http 请求)、真实对象很难搭建起来(例如 mmcv 需要在 github action 中测试 pavi,而 pavi 是 sensetime 内部库)、真实对象的行为很难触发(例如网络异常),这种情况下使用模拟对象可以隔绝依赖的影响,只关注代码的逻辑。unittest.mock 模块允许替换代码中的对象并且可以使用断言确认对象是否被调用。
4.3.2 基本用法
unittest.mock 中常用的两个核心类是 Mock、MagicMock 以及一个装饰器 patch,在这里只介绍 MagicMock、patch,因为MagicMock 是 Mock 的子类,MagicMock 默认提供了大多数魔术方法的实现,而 Mock 没有提供,如果 Mock 要使用魔术方法,需单独实现。注:Mock 和 MagicMock 的区别可参考以下两篇文章
MagicMock
A mock object
复制 # 参考 https://realpython.com/python-mock-library/#lazy-attributes-and-methods
>>> from unittest.mock import MagicMock
>>> mock = MagicMock()
>>> mock
<MagicMock id='139789887074064'>
# 当你访问属性或者方法的时候,mock会为你创建该属性或者方法
>>> mock.hello
<MagicMock name='mock.hello' id='139789887729232'>
>>> mock.hello_world()
<MagicMock name='mock.hello_world()' id='139789886527632'>
# 另外,被创建的属性和方法同样也是 mock 对象,于是我们可以这样
>>> mock.hello_apple.hello_orange()
<MagicMock name='mock.hello_apple.hello_orange()' id='139789929393936'>
我们可以使用 mock 对象的 assert 方法检查对象的调用是否符合预期。
复制 >>> from unittest.mock import MagicMock
>>> mock = MagicMock()
>>> mock('apple')
>>> mock.assert_called_with('apple')
>>> mock.assert_called_with('orange')
---------------------------------------------------------------------------
AssertionError Traceback (most recent call last)
<ipython-input-10-f65a514e6d54> in <module>
----> 1 mock.assert_called_with('orange')
/mnt/data/miniconda3/envs/mmcv-pt1.8/lib/python3.7/unittest/mock.py in assert_called_with(_mock_self, *args, **kwargs)
876 if expected != actual:
877 cause = expected if isinstance(expected, Exception) else None
--> 878 raise AssertionError(_error_message()) from cause
879
880
AssertionError: Expected call: mock('orange')
Actual call: mock('apple')
MagicMock 提供了很多断言方法,下面列出常用的几个方法,更多方法请浏览 the-mock-class
Assert that the mock was called at least once
Assert that the mock was called exactly once
assert_called_with(*args, **kwargs)
This method is a convenient way of asserting that the last call has been made in a particular way
assert_called_once_with(*args, **kwargs)
Assert that the mock was called exactly once and that call was with the specified arguments.
可以设置 mock 对象的返回值
复制 >>> from unittest.mock import MagicMock
>>> thing = ProductionClass()
>>> thing.method = MagicMock(return_value=3)
>>> thing.method(3, 4, 5, key='value')
3
>>> thing.method.assert_called_with(3, 4, 5, key='value')
side_effect 定义当 mock 对象被调用时将发生的行为。side_effect 的值可以是一个可回调对象,该函数在 mock 被调用时调用,也可以是一个可迭代对象,也可以是一个异常对象
复制 >>> from unittest.mock import MagicMock
>>> mock = Mock()
>>> def return_input(input):
... return input
>>> mock.side_effect = return_input
>>> mock('hello apple')
'hello apple'
>>> mock('hello orange')
'hello orange'
复制 >>> from unittest.mock import MagicMock
>>> mock = Mock()
>>> mock.side_effect = [3, 2, 1]
>>> mock()
3
>>> mock()
2
>>> mock()
1
复制 >>> from unittest.mock import MagicMock
>>> mock = Mock()
>>> mock.side_effect = Exception('Boom!')
>>> mock()
An example
复制 # 参考 https://stackoverflow.com/questions/15753390/how-can-i-mock-requests-and-the-response
# mock/example1.py
import requests
import unittest
from unittest.mock import MagicMock
class PackageUtils:
def get_package_versions(self, url: str) -> list:
response = requests.get(url)
json_data = response.json()
versions = json_data['releases']
return list(versions.keys())
class TestPackageUtils(unittest.TestCase):
def test_get_package_versions(self):
url = 'https://pypi.org/pypi/openmim/json'
package_utils = PackageUtils()
versions = package_utils.get_package_versions(url)
assert versions == ['0.1.0', '0.1.1', '0.1.2', '0.1.3', '0.1.4', '0.1.5']
def test_get_package_versions_will_all_mock(self):
url = 'https://pypi.org/pypi/openmim/json'
package_utils = PackageUtils()
package_utils.get_package_versions = MagicMock(return_value=['0.1.0', '0.2.0'])
versions = package_utils.get_package_versions(url)
package_utils.get_package_versions.assert_called_with(url)
assert versions == ['0.1.0', '0.2.0']
def test_get_package_versions_with_mock(self):
def mock_requests_get(*args, **kwargs):
class MockResponse:
def json(self):
return {'releases': {'0.1.0': 'apple', '0.2.0': 'orange'}}
return MockResponse()
url = 'https://pypi.org/pypi/openmim/json'
package_utils = PackageUtils()
requests.get = MagicMock(side_effect=mock_requests_get)
versions = package_utils.get_package_versions(url)
requests.get.assert_called_with(url)
assert versions == ['0.1.0', '0.2.0']
互动环节:分析test_get_package_verions()
、test_get_package_versions_will_all_mock()
、test_get_package_verions_with_mock()
三种测试写法的优缺点
patch
unittest.mock 提供了 patch 装饰器,可以将 mock 行为限制在测试用例的作用空间上。它既可以作为装饰器使用,也可以作为内容管理器。Magicmock 和 patch 的区别见 mocking-a-class-mock-or-patch
复制 # mock/package_uitls.py
import requests
class PackageUtils:
def get_package_versions(self, url: str) -> list:
response = requests.get(url)
json_data = response.json()
versions = json_data['releases']
return list(versions.keys()
复制 # mock/example2.py
import unittest
from unittest.mock import patch
from package_utils import PackageUtils
class TestPackageUtils(unittest.TestCase):
@patch('package_utils.requests')
def test_get_package_versions_with_mock(self, mock_requests):
def mock_requests_get(*args, **kwargs):
class MockResponse:
def json(self):
return {'releases': {'0.1.0': 'apple', '0.2.0': 'orange'}}
return MockResponse()
url = 'https://pypi.org/pypi/openmim/json'
package_utils = PackageUtils()
mock_requests.get.side_effect = mock_requests_get
versions = package_utils.get_package_versions(url)
mock_requests.get.assert_called_with(url)
assert versions == ['0.1.0', '0.2.0']
复制 # mock/example3.py
import unittest
from unittest.mock import patch
from package_utils import PackageUtils
class TestPackageUtils(unittest.TestCase):
def test_get_package_versions_with_mock(self):
def mock_requests_get(*args, **kwargs):
class MockResponse:
def json(self):
return {'releases': {'0.1.0': 'apple', '0.2.0': 'orange'}}
return MockResponse()
url = 'https://pypi.org/pypi/openmim/json'
with patch('package_utils.requests') as mock_requests:
package_utils = PackageUtils()
mock_requests.get.side_effect = mock_requests_get
versions = package_utils.get_package_versions(url)
mock_requests.get.assert_called_with(url)
assert versions == ['0.1.0', '0.2.0']
事实上,在上面的例子中,我们并不需要 mock 整个对象,只需 mock get 方法即可
复制 # mock/example4.py
import unittest
from unittest.mock import patch
import requests
from package_utils import PackageUtils
class TestPackageUtils(unittest.TestCase):
def test_get_package_versions_with_mock(self):
def mock_requests_get(*args, **kwargs):
class MockResponse:
def json(self):
return {'releases': {'0.1.0': 'apple', '0.2.0': 'orange'}}
return MockResponse()
url = 'https://pypi.org/pypi/openmim/json'
with patch.object(requests, 'get', side_effect=mock_requests_get):
package_utils = PackageUtils()
versions = package_utils.get_package_versions(url)
requests.get.assert_called_with(url)
assert versions == ['0.1.0', '0.2.0']
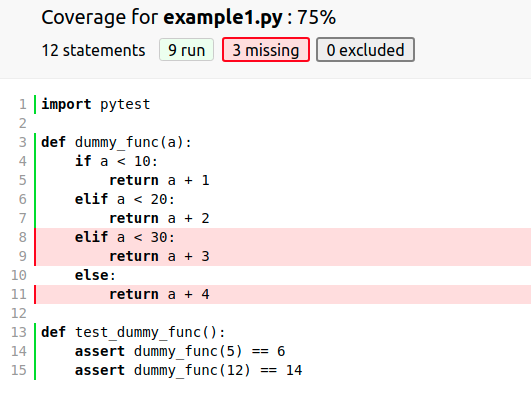
coverage.py 是一个用来统计 Python 程序代码覆盖率的工具。
5.1 分析测试覆盖率
https://asciinema.org/a/435655
复制 # coverage/example1.py
import pytest
def dummy_func(a):
if a < 10:
return a + 1
elif a < 20:
return a + 2
elif a < 30:
return a + 3
else:
return a + 4
def test_dummy_func():
assert dummy_func(5) == 6
assert dummy_func(12) == 14
复制 coverage run -m pytest example.py
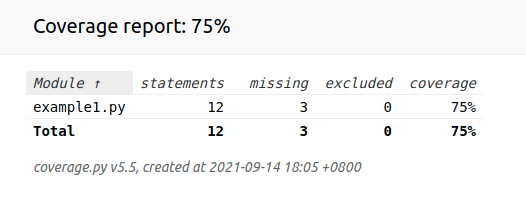
使用 coverage report 生成测试报告
复制 Name Stmts Miss Cover Missing
-------------------------------------------
example1.py 12 3 75% 8-11
-------------------------------------------
TOTAL 12 3 75%
使用 coverage html 生成 html 页面,页面标记未被测试的行
生成 html 后打开index.html
点击example1.py
可以查看未被测试的行
5.2 根据反馈完善单元测试
https://asciinema.org/a/435656
复制 # coverage/example2.py
import pytest
def dummy_func(a):
if a < 10:
return a + 1
elif a < 20:
return a + 2
elif a < 30:
return a + 3
else:
return a + 4
def test_dummy_func():
assert dummy_func(5) == 6
assert dummy_func(12) == 14
assert dummy_func(24) == 27
assert dummy_func(30) == 34
复制 Name Stmts Miss Cover Missing
-------------------------------------------
example1.py 12 3 75% 8-11
example2.py 14 0 100%
-------------------------------------------
TOTAL 26 3 88%
可以看到,通过添加更多的测试用例,example2.py 的行被完全覆盖了,即每一行都被测到了。
6. 运行 MMEngine 中的单元测试
6.1 命令行运行 mmengine 单元测试
复制
conda create --name mmengine_test python=3.9
conda activate mmengine_test
git clone https://github.com/open-mmlab/mmengine.git
cd mmengine
# 安装单元测试所需要的依赖包
pip install -r requirements/tests.txt
# 源码安装 mmengine
pip install -v -e .
# 运行 test_hooks 的单元测试
pytest tests/test_hooks
# 分析 test_hooks 的测试覆盖率
coverage run -m pytest tests/test_hooks
命令行输入 pytest tests/test_hooks
得到如下
6.2 vscode debug 单元测试
安装配置 pytest 插件
根据以下步骤进行单元测试
点击 Configure Python Tests
接着可以看见下图,我们选择一个测试代码,这里以 tests/test_hooks/test_param_scheduler_hook.py
为例,选择类 TestParamSchedulerHook
中的方法 test_after_train_iter
。
在该方法左边有个运行按钮 “▶” ,点击该按钮进行单元测试。
测试完成后会显示完成图标✅
同样, pytest 支持 debug 断点测试,一共分为以下两步:
7. 参考资料
https://docs.python.org/zh-cn/3/library/unittest.html
https://docs.python.org/3/library/unittest.mock.html
https://docs.pytest.org/en/6.2.x/
https://realpython.com/python-mock-library/
https://realpython.com/pytest-python-testing/