OpenMMLab 贡献者成长体系教程
  • OpenMMLab 贡献者成长地图
  • 活动
    • 超级视客营
    • MMSIG任务领取指南
  • 通用贡献者教程(建设中)
    • 开源协议学习(建设中)
    • 环境配置(建设中)
      • Windows 环境配置
      • Github Codespaces 云 Linux 环境
      • Windows WSL 环境配置
      • Ubuntu 20.04 环境配置(建设中 2)
      • ubuntu docker 环境配置
    • 熟悉 GitHub/Git(建设中)
    • 代码规范
    • 文档类贡献指南(建设中)
      • MMSIG 文档贡献指南 (建设中)
      • 算法库文档贡献指南 (建设中)
    • Type Hints 贡献指南(建设中)
    • 单元测试贡献指南(建设中)
    • 源码阅读及调试技巧(建设中)
  • 算法库贡献者教程(建设中)
    • Playground(建设中)
    • MMEngine(建设中)
      • 新 Config 适配贡献指南
    • MMCV(建设中)
      • Transform 数据增强贡献指南
      • 算子贡献指南(建设中)
    • MMPreTrain(建设中)
      • 骨干网络贡献指南(建设中)
      • 自监督算法贡献指南(建设中)
    • MMDetection(建设中)
    • MMYOLO(建设中)
    • MMDetection3D(建设中)
    • MMOCR (建设中)
    • MMSegmentation(建设中)
      • 贡献一个标准格式的数据集
      • 贡献一个数据集加载方式(建设中)
    • MMPose (建设中)
    • MMEditing(建设中)
    • MMDeploy (建设中)
由 GitBook 提供支持
在本页
  • 1. Github Codespaces 介绍
  • 1.1 切换主题暗黑色
  • 1.2 Codespaces 预装的环境
  • 1.3 在浏览器端安装插件
  • 2. 运行 MMDetection 实例分割推理 Demo
  • 3. 在 Github Codespaces 中 Debug
  • 3.1 使用 python -m debugpy --listen 5678 --wait-for-client 进行 Debug
  • 3.2 设置 pyd 别名简化 python -m debugpy --listen 5678 --wait-for-client 命令
  • 4. pre-commit 运行代码审查

这有帮助吗?

在GitHub上编辑
  1. 通用贡献者教程(建设中)
  2. 环境配置(建设中)

Github Codespaces 云 Linux 环境

上一页Windows 环境配置下一页Windows WSL 环境配置

最后更新于1年前

这有帮助吗?

我们了解到一些社区的小伙伴平时有以下的需求和困扰:

  • 平时使用 Windows 进行开发,但是提 PR 时 Windows 的命令行 pre-commit 代码审查始终过不去,且不想安装 WSL。

  • 想有一个网络状况比较好的 Linux 环境,在浏览器上就能方便的对 OpenMMLab 算法进行 Debug 调试学习。

这里本菜狗推荐使用 Github 的 codespaces 云 Linux 环境,每个月有 120-core 时的免费时长,15 GB 免费磁盘,可以在这个环境下进行 Debug 和修 pre-commit 代码审查的 Bug。

1. Github Codespaces 介绍

访问 ,选择 Github 提供的 Blank 模板。我们可以在这个服务器上看源码或者 Debug。

有四种打开这个 codespaces 的方式

  • Open in browser (使用浏览器打开)

  • Open in Visual Studio Code(使用VSCODE打开)

  • Open in JetBrains Gateway(使用 JetBrains Gateway 打开)

  • Open in JupyterLab (使用 JupyterLab 打开)

本菜狗推荐使用 Open in browser 和 Open in Visual Studio Code,本教程就以浏览器端的 VSCODE 进行演示,这需要有电脑+有谷歌浏览器+能访问 Github 就能轻松 Debug 了。

1.1 切换主题暗黑色
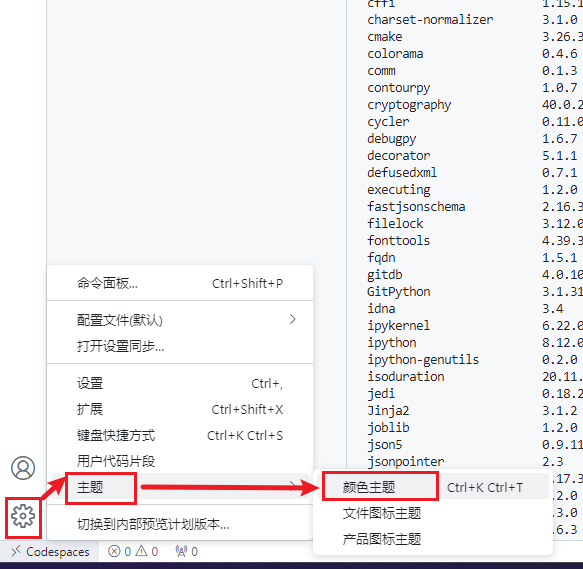
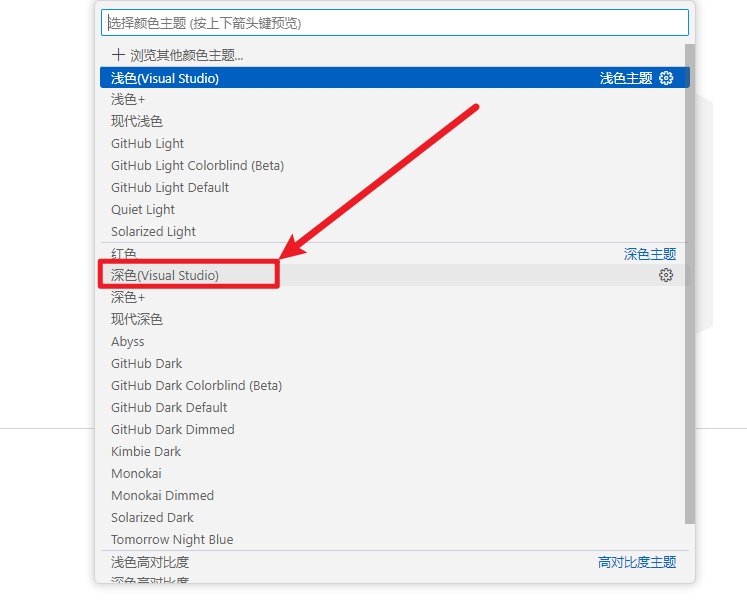
1.2 Codespaces 预装的环境

在工作区点击鼠标右键,并选择在集成终端中打开,输入以下命令查看 ubuntu 版本为 18.04,Python 版本为 3.10.4。
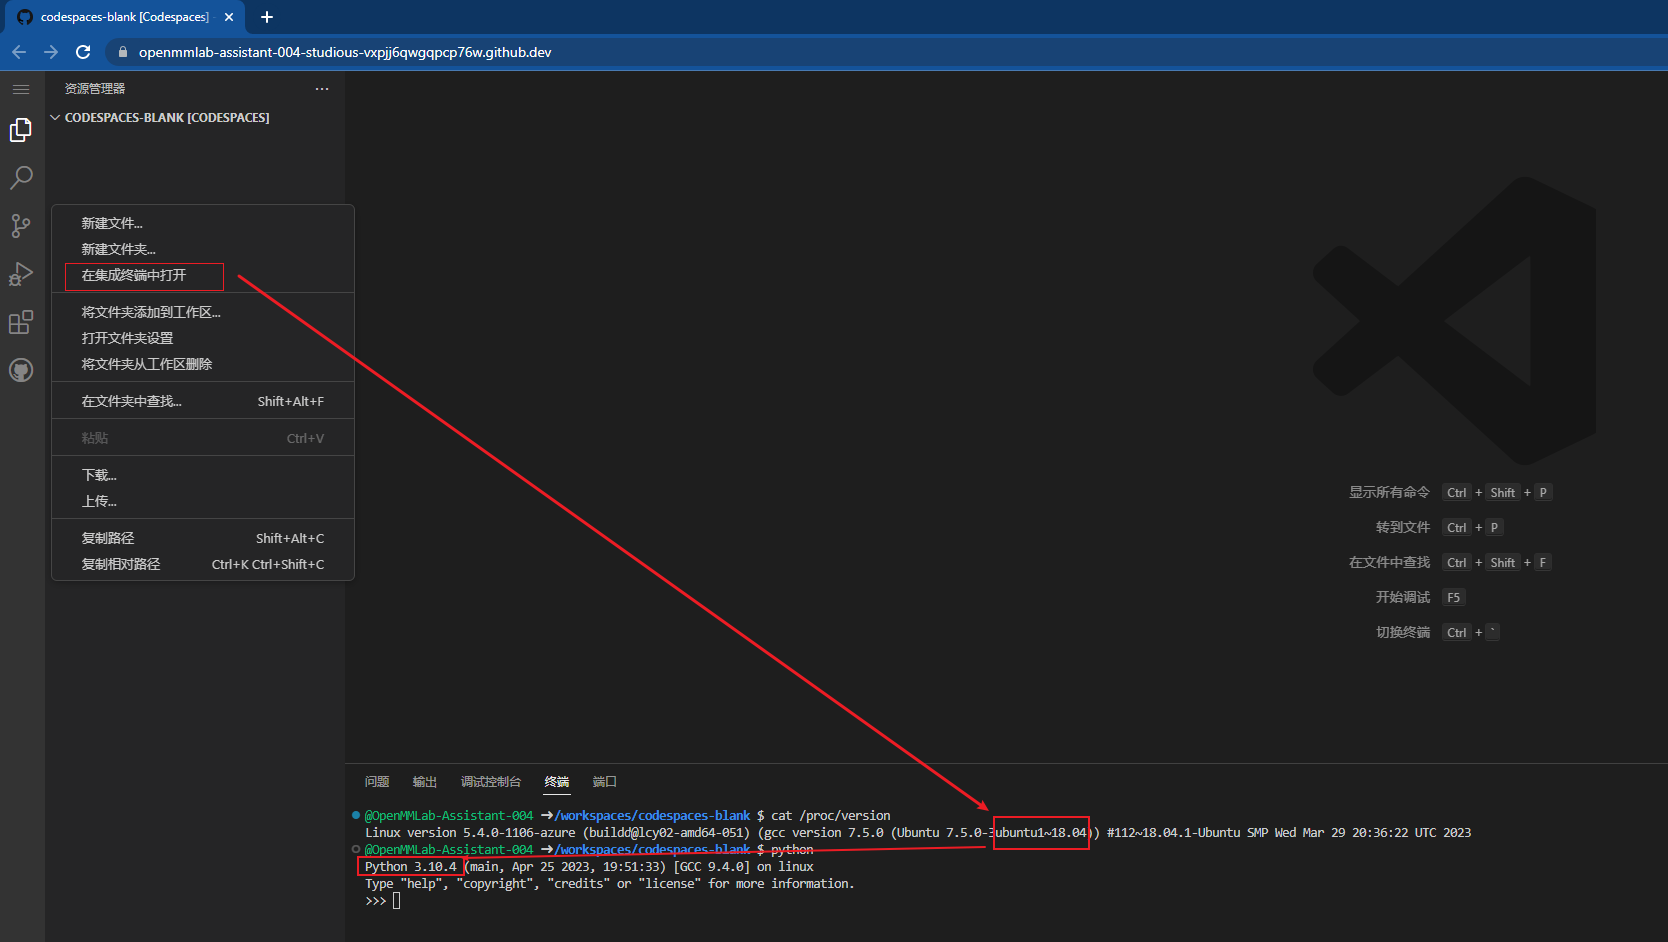
cat /proc/version
python

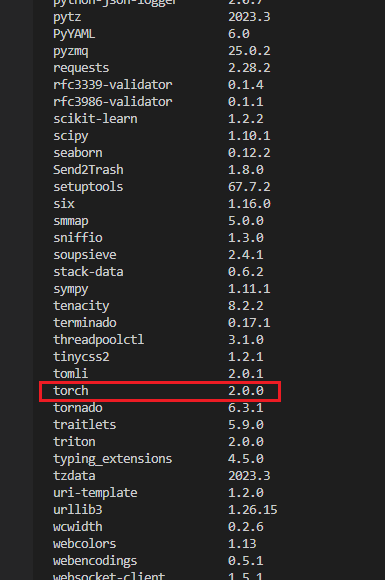
同时我们运行 pip list 我们可以看到系统环境的 python 预装了 torch 的版本为 2.0.0。在本文中就不安装 miniconda 和虚拟环境了,就直接使用 codespace 的默认环境进行代码的调试了。
1.3 在浏览器端安装插件

为了能够在浏览器端的 vscode 上智能的编辑代码和调试代码,需要在 vscode 插件市场安装以下 Python 插件。

2. 运行 MMDetection 实例分割推理 Demo

更新 Ubuntu 依赖,并安装后续需要安装的依赖。

sudo apt update -y
sudo apt-get install libgl1-mesa-glx -y

安装 openmim,并使用 mim 安装 mmcv预编译包。

pip install openmim
mim install "mmcv==2.0.0"

git clone mmdetection ,并源码安装 mmdetection。

git clone https://github.com/open-mmlab/mmdetection.git
# git clone https://gitee.com/open-mmlab/mmdetection.git
cd mmdetection
git checkout tags/v3.0.0
pip install -v -e .
code .   # 浏览器新标签页打开 mmdetection 工作区

下载 rtmdet-ins 权重文件和配置文件。

cd path/to/mmdetection
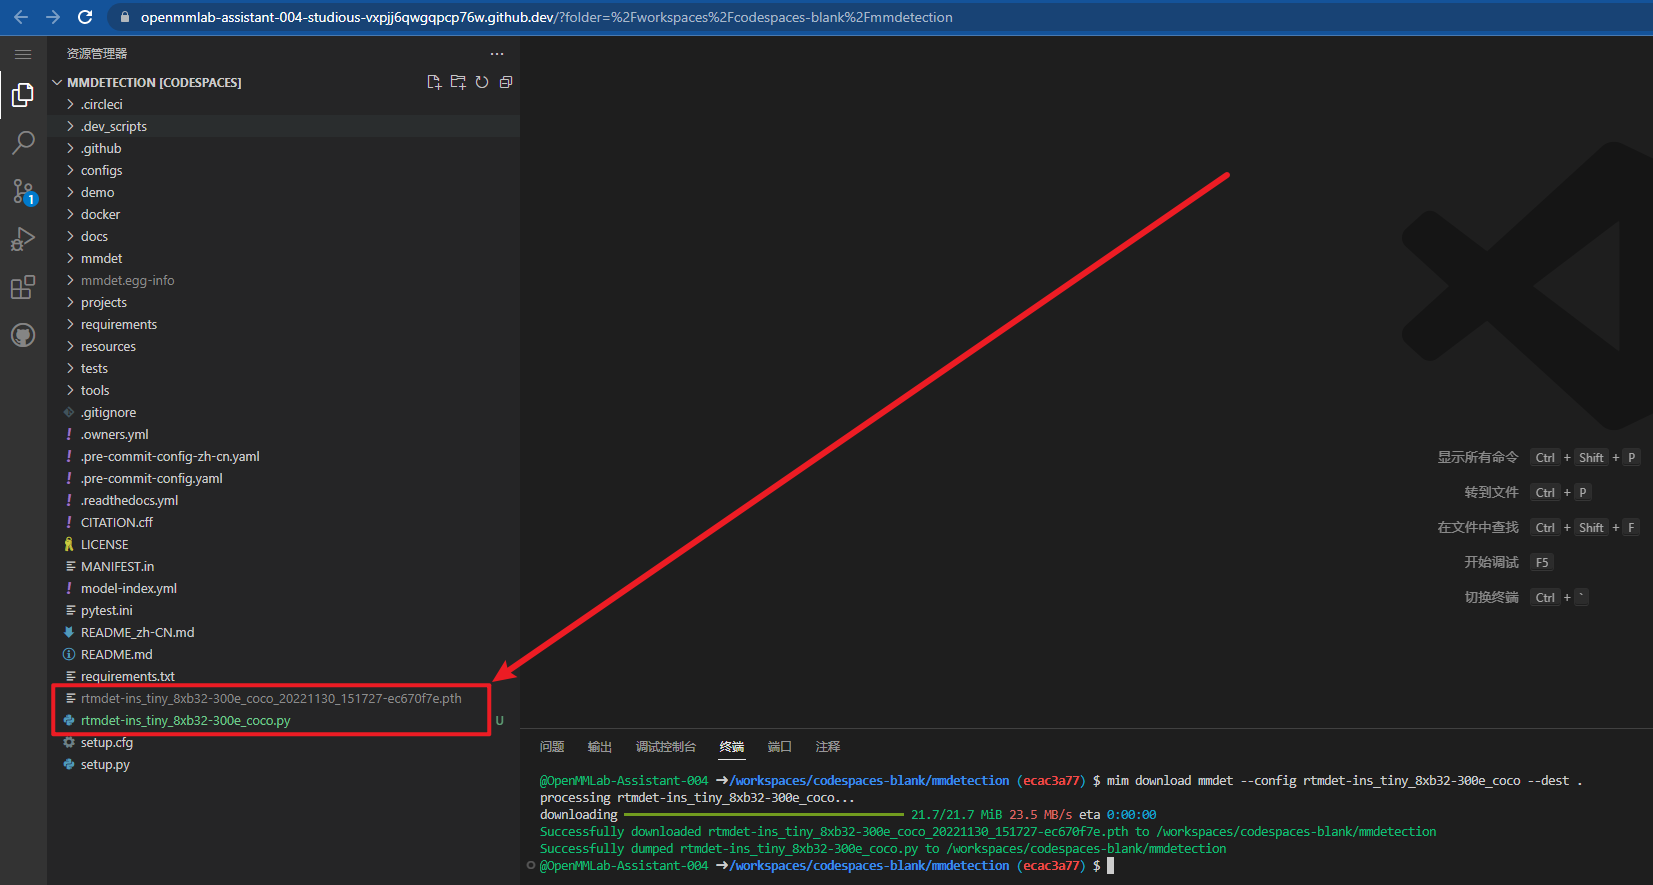
mim download mmdet --config rtmdet-ins_tiny_8xb32-300e_coco --dest .

下载将需要几秒钟或更长时间,这取决于你的网络环境。完成后,你会在当前文件夹中发现两个文件 、rtmdet_tiny_8xb32-300e_coco.py 和 rtmdet_tiny_8xb32-300e_coco_20220902_112414-78e30dcc.pth。
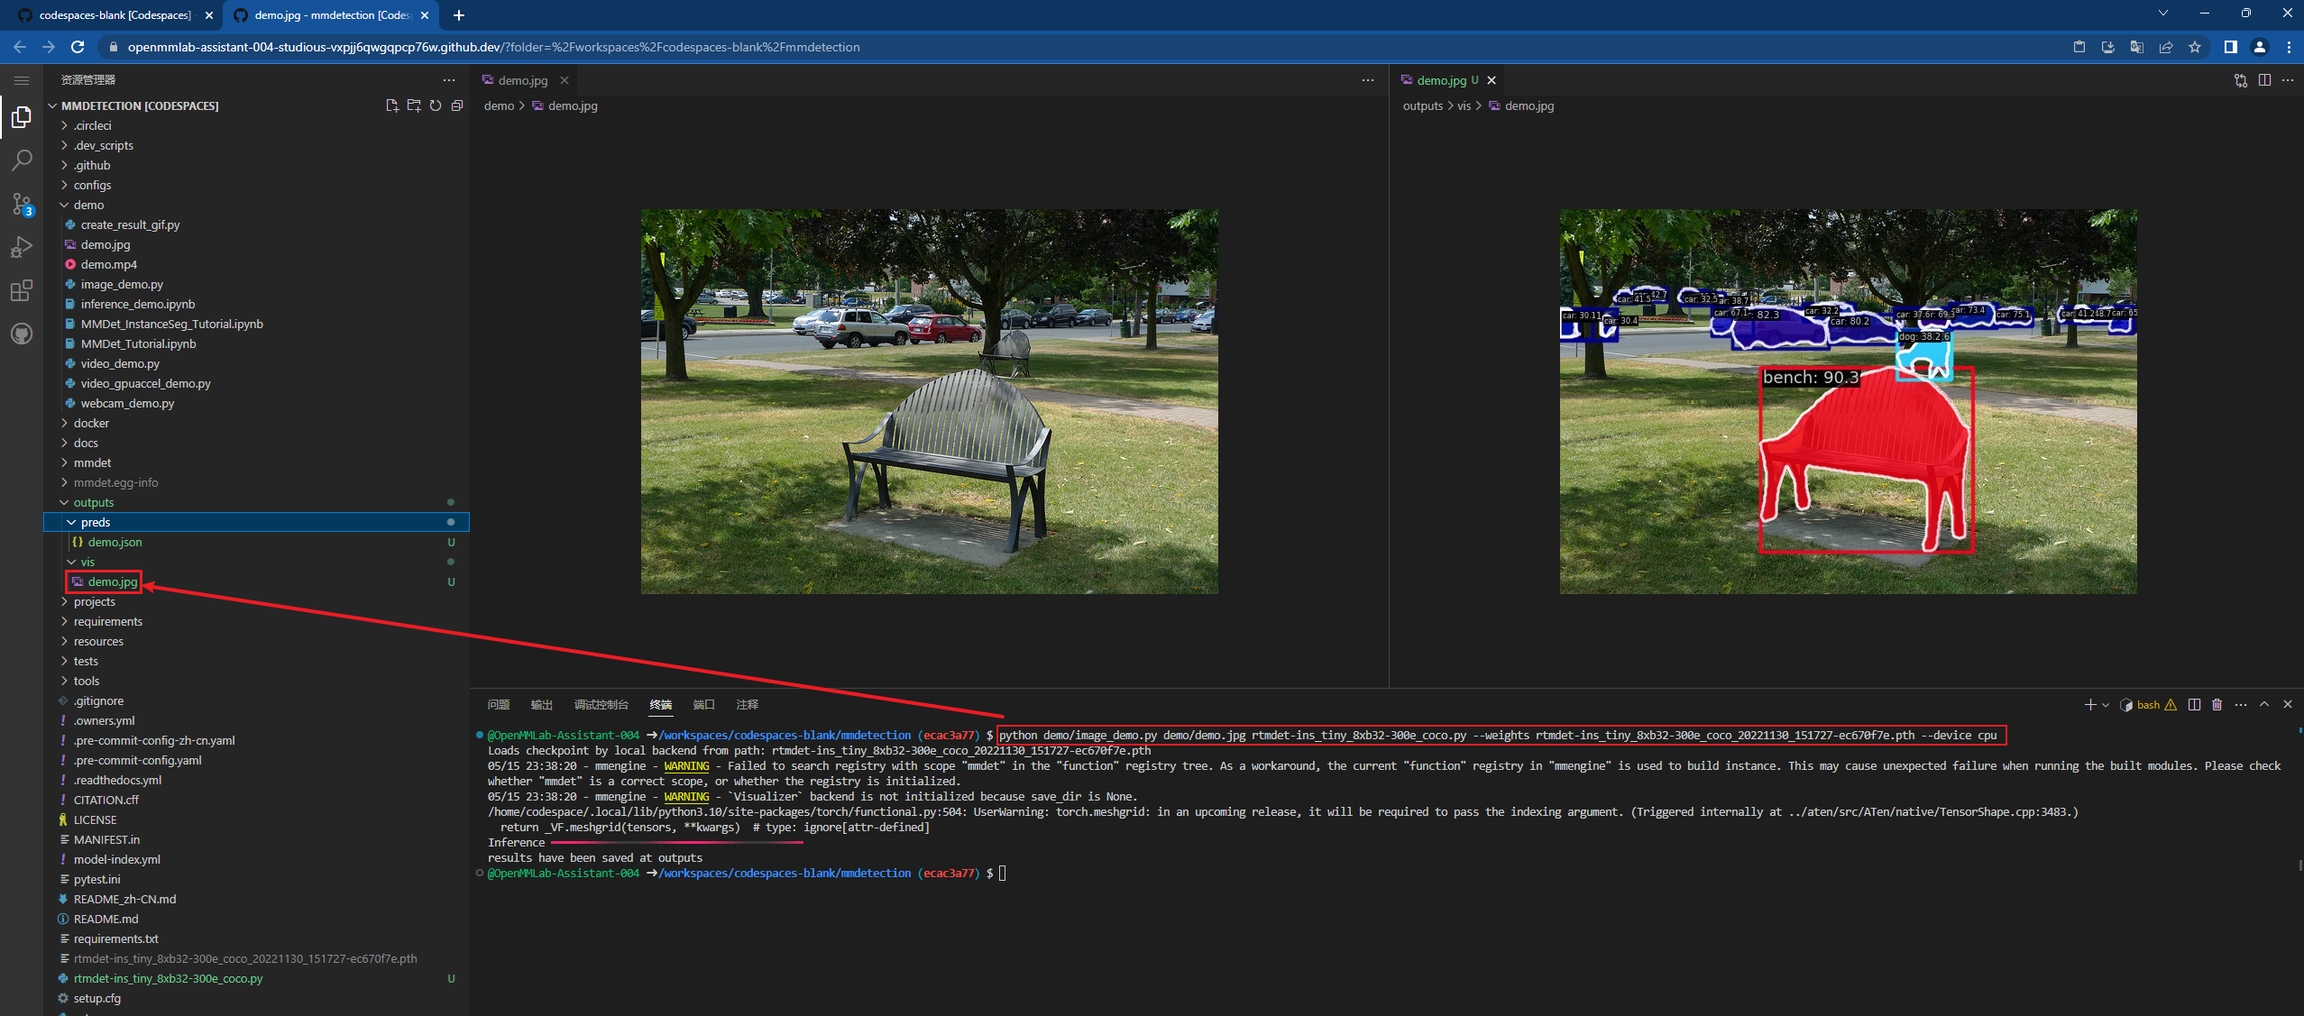
python demo/image_demo.py demo/demo.jpg rtmdet-ins_tiny_8xb32-300e_coco.py --weights rtmdet-ins_tiny_8xb32-300e_coco_20221130_151727-ec670f7e.pth --device cpu

运行以上命令,使用 rtmdet-ins_tiny_8xb32-300e_coco.py 模型和权重,对图片 demo/demo.jpg 图片进行目标检测和实例分割,预测结果生成在 outputs/vis/demo.jpg 中,预测结果可视化如下。
3. 在 Github Codespaces 中 Debug

3.1 使用 python -m debugpy --listen 5678 --wait-for-client 进行 Debug

先安装 debug 需要的 python 依赖包 debugpy 并安装好自己 VSCODE 的 Python 插件。

pip install debugpy

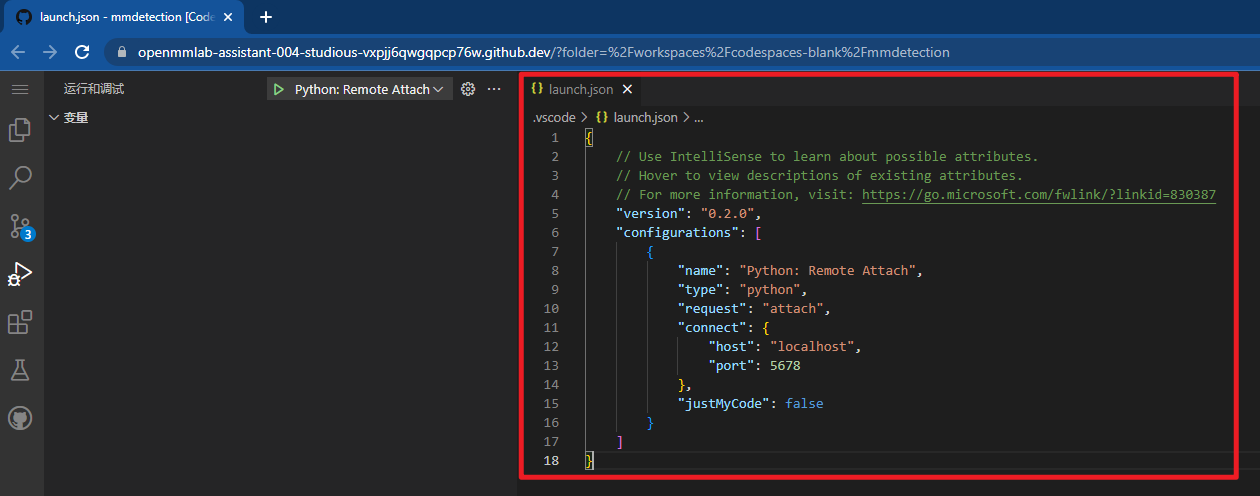
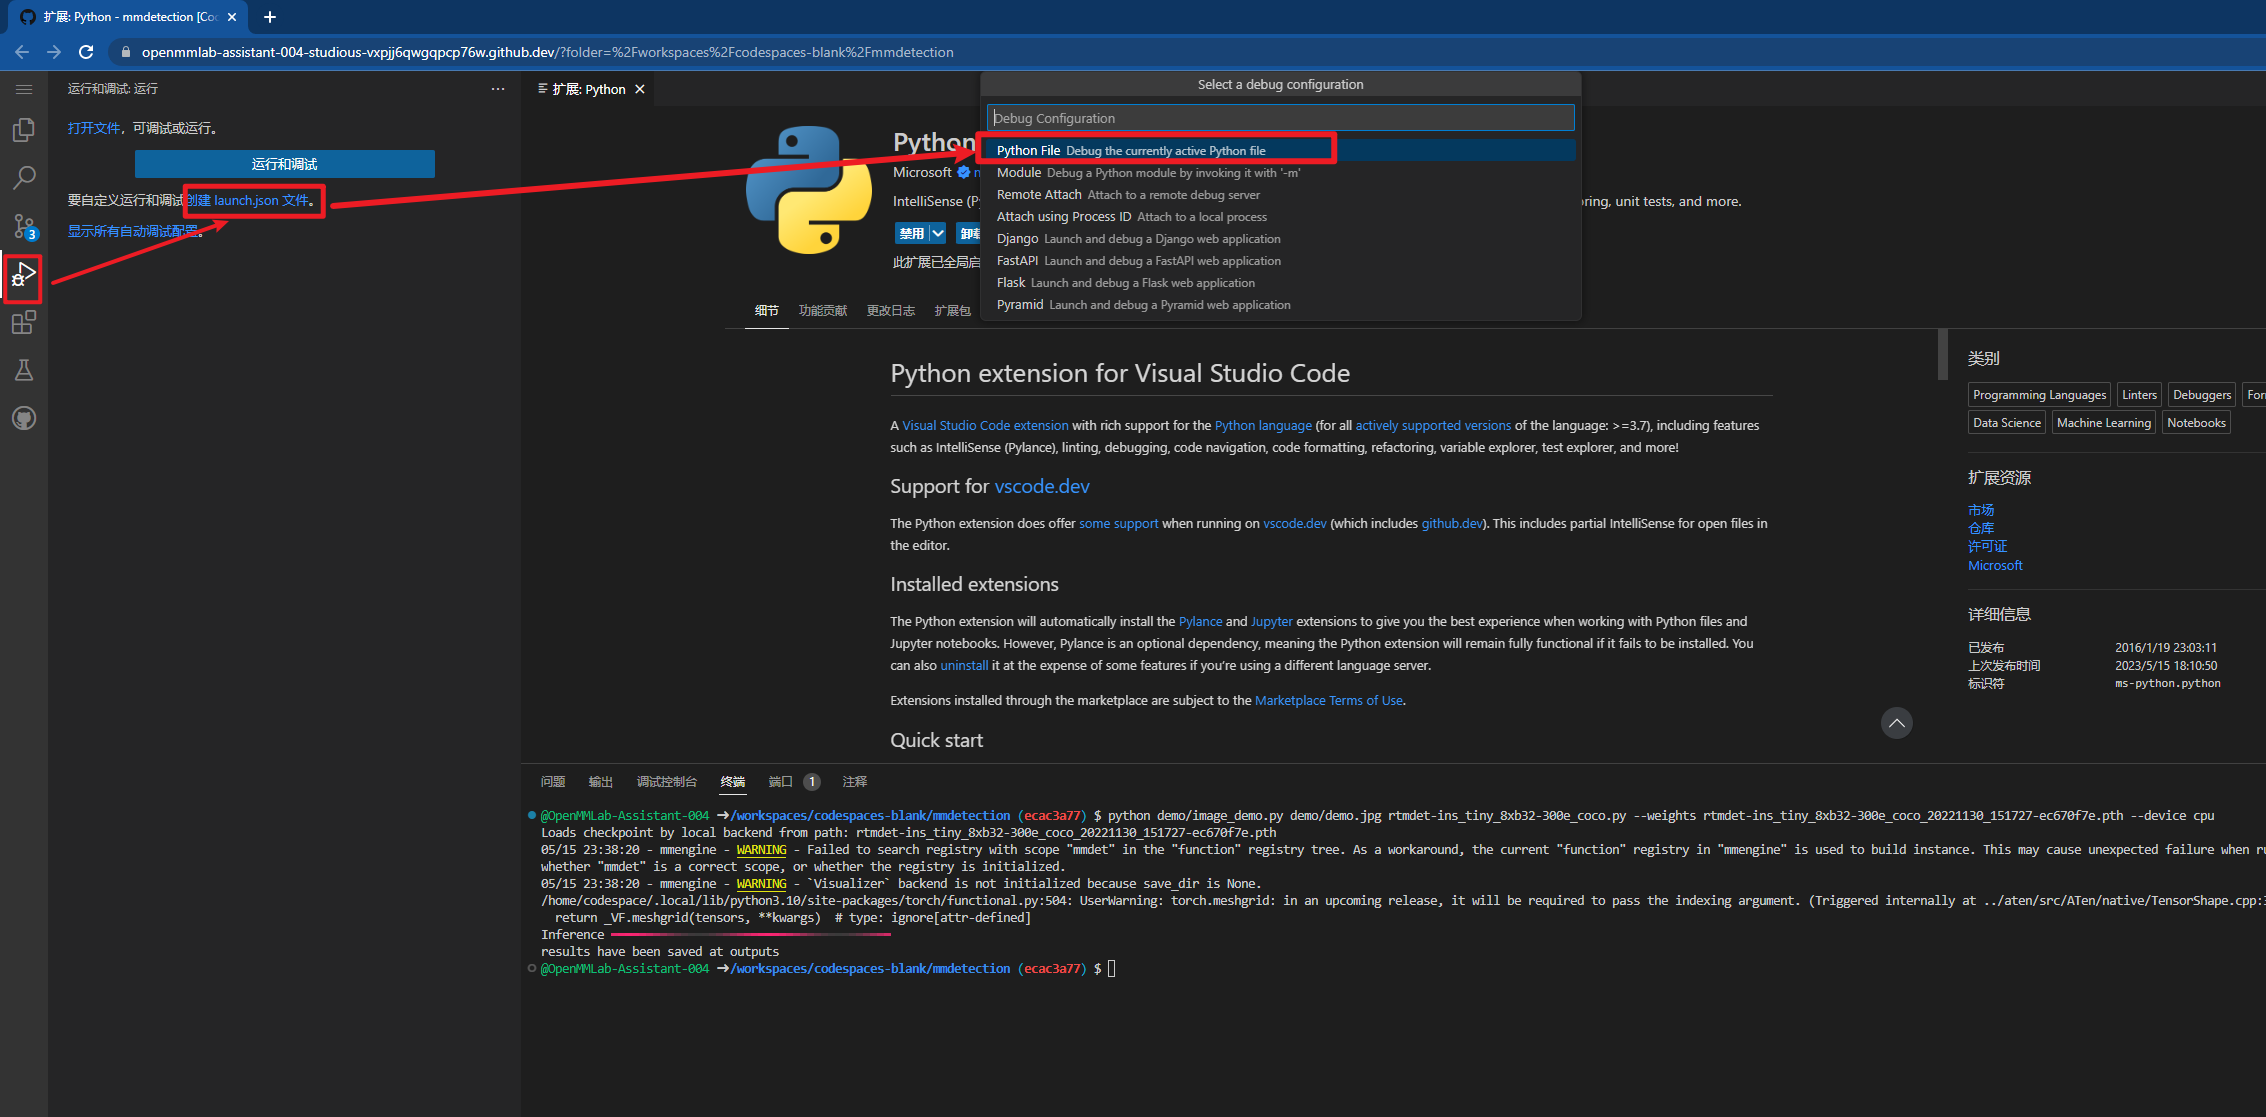
选择左侧的 运行和调试按钮,并点击创建 launch.json 文件,选择 Python 然后选择 Python File。
{
    // Use IntelliSense to learn about possible attributes.
    // Hover to view descriptions of existing attributes.
    // For more information, visit: https://go.microsoft.com/fwlink/?linkid=830387
    "version": "0.2.0",
    "configurations": [
        {
            "name": "Python: Remote Attach",
            "type": "python",
            "request": "attach",
            "connect": {
                "host": "localhost",
                "port": 5678
            },
            "justMyCode": false
        }
    ]
}

并将上述 Debug 的配置复制到 launch.json 中。

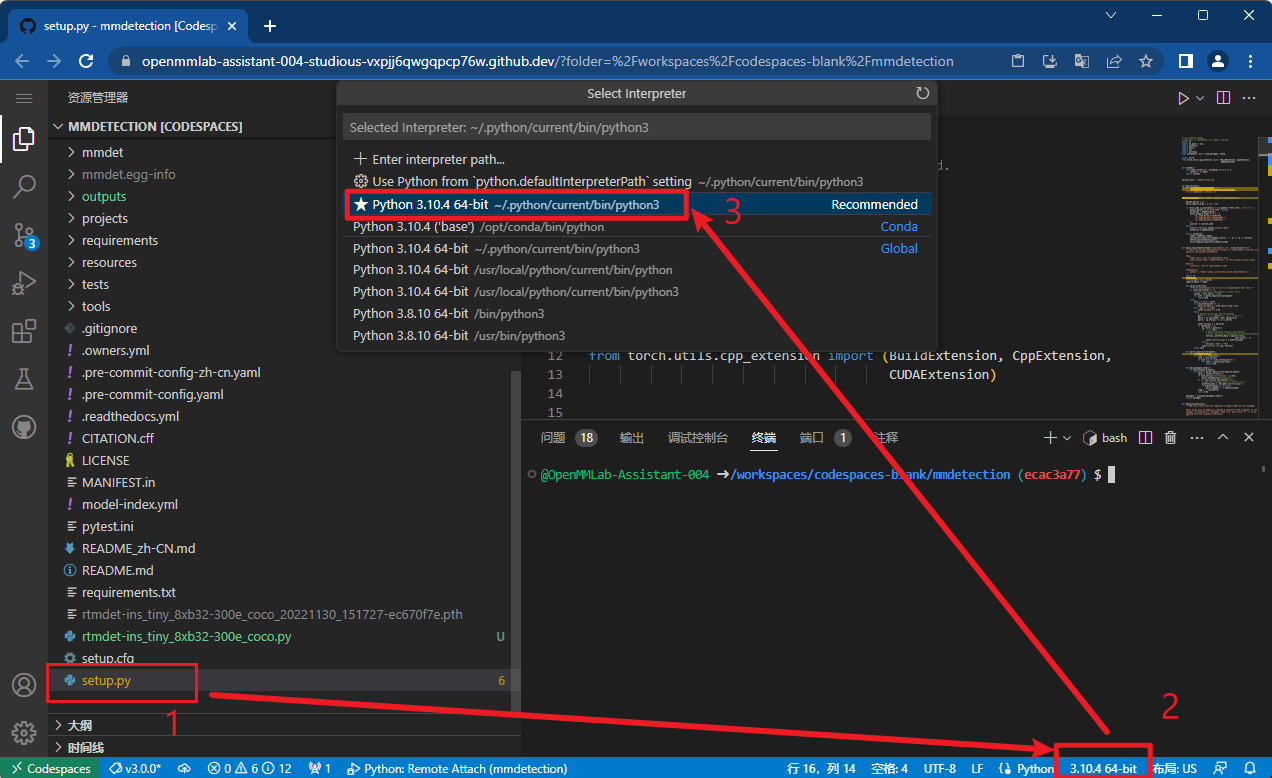
我们先打开一个 python 文件,然后点击又下角 python 插件环境选择按钮,最后选择一个 python 环境,这里我们选择 ~/.python/current/bin/python3 这个环境。
我们将以下原始的命令行运行 RTMDet 实例分割的程序命令,稍加改造一下:

python demo/image_demo.py demo/demo.jpg rtmdet-ins_tiny_8xb32-300e_coco.py --weights rtmdet-ins_tiny_8xb32-300e_coco_20221130_151727-ec670f7e.pth --device cpu

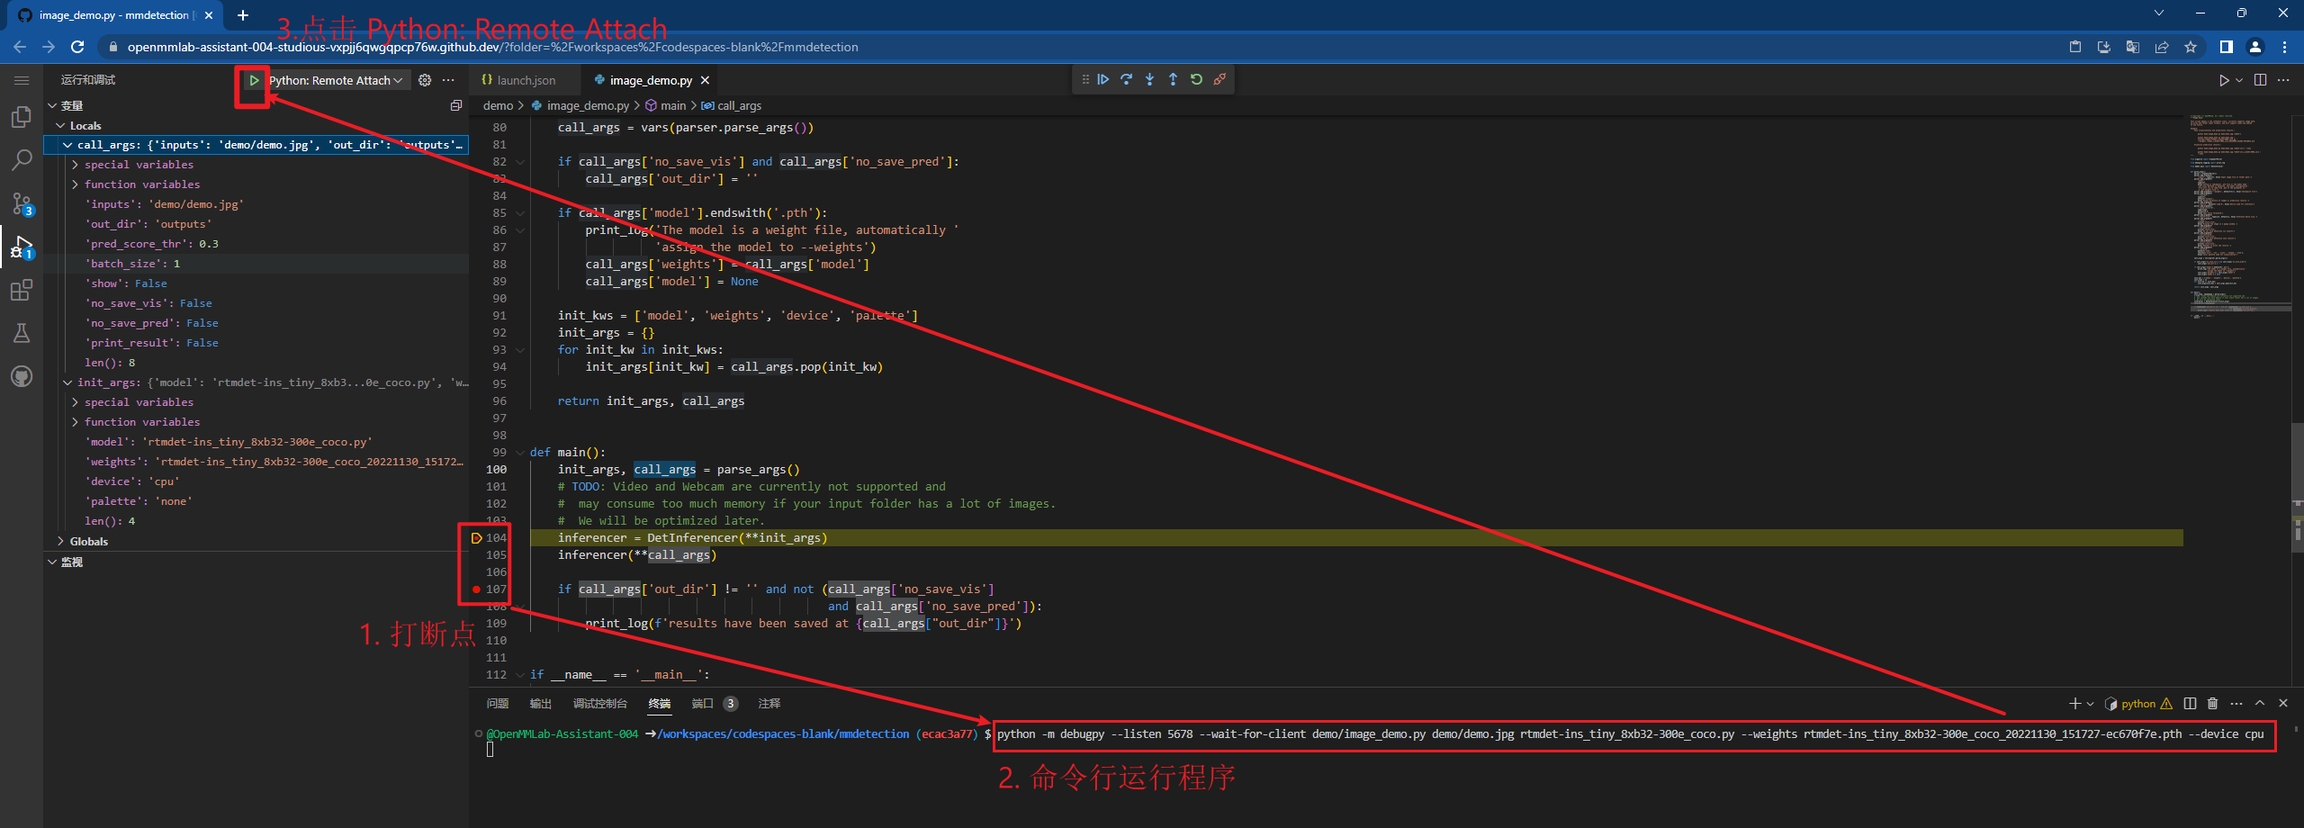
将 python 替换为 python -m debugpy --listen 5678 --wait-for-client 得到以下的命令,意思是使用 debugpy 这个工具联合 VSCODE 进行 debug,开放程序的 5678 端口用户和 vscode 客户端进行通信,--wait-for-client 的意思是等待客户端点击 Python: Remote Attach 按钮后才正式 Debug 程序。


# Debug 命令
python -m debugpy --listen 5678 --wait-for-client demo/image_demo.py demo/demo.jpg rtmdet-ins_tiny_8xb32-300e_coco.py --weights rtmdet-ins_tiny_8xb32-300e_coco_20221130_151727-ec670f7e.pth --device cpu

这样我们先在程序中打断点,然后在命令行的mmdetection路径下运行命令以上命令,最后点击 Python:Remote Attach 按钮就能打断点进行调试了。
3.2 设置 pyd 别名简化 python -m debugpy --listen 5678 --wait-for-client 命令

上述 debug 的方式有一个很大的问题,在每次 debug 前都需要将 python 替换为 python -m debugpy --listen 5678 --wait-for-client 需要输入这么一大段,及其麻烦和耗费时间,所以想了设置别名的方法,将 python -m debugpy --listen 5678 --wait-for-client 简化为 pyd 命令。

我们通过code ~/.bashrc命令在Linux系统中的~/.bashrc 中添加以下命令(如果使用的 shell 是 zsh 需要添加到 .zshrc中)。
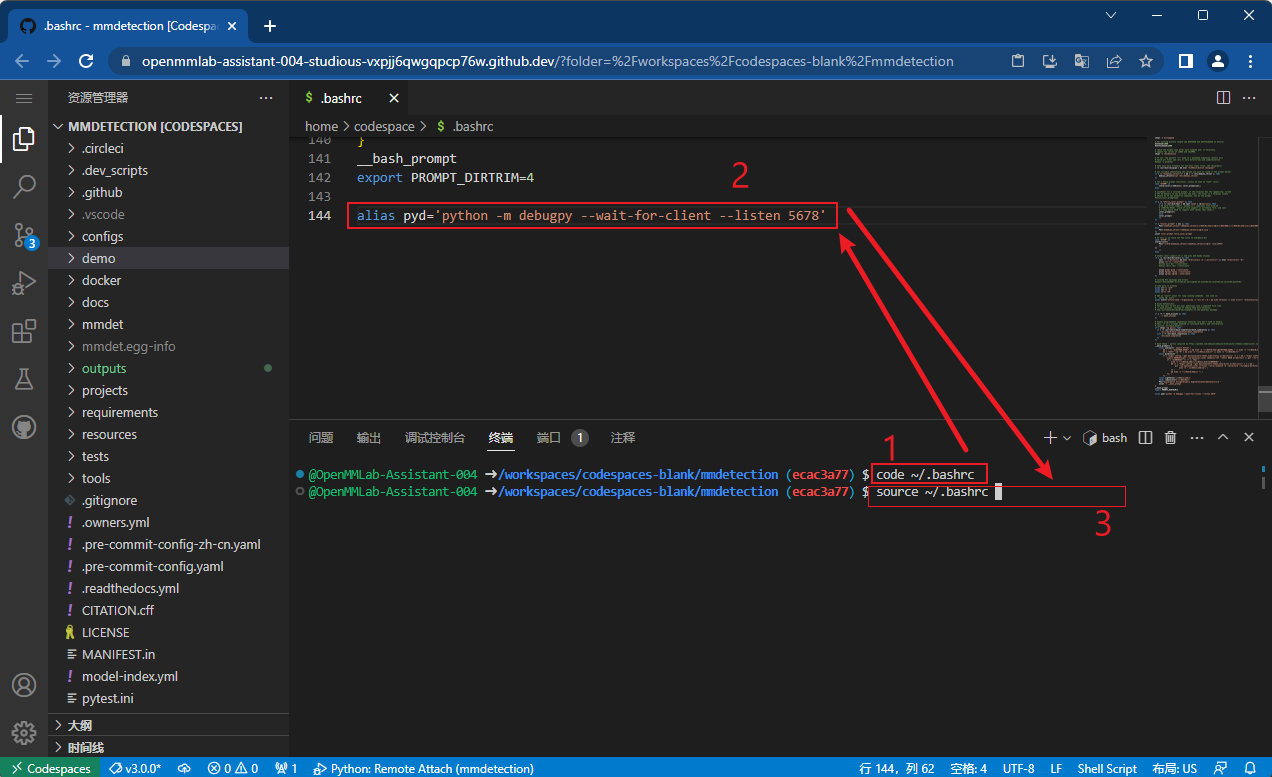
alias pyd='python -m debugpy --wait-for-client --listen 5678'

在终端中运行 source ~/.bashrc 或者重新打开 vscode 中的终端,这样我们就只需要将原始运行程序的命令中的 python 替换为 pyd ,最后点击 Debug 按钮就能愉快的 Debug 了。
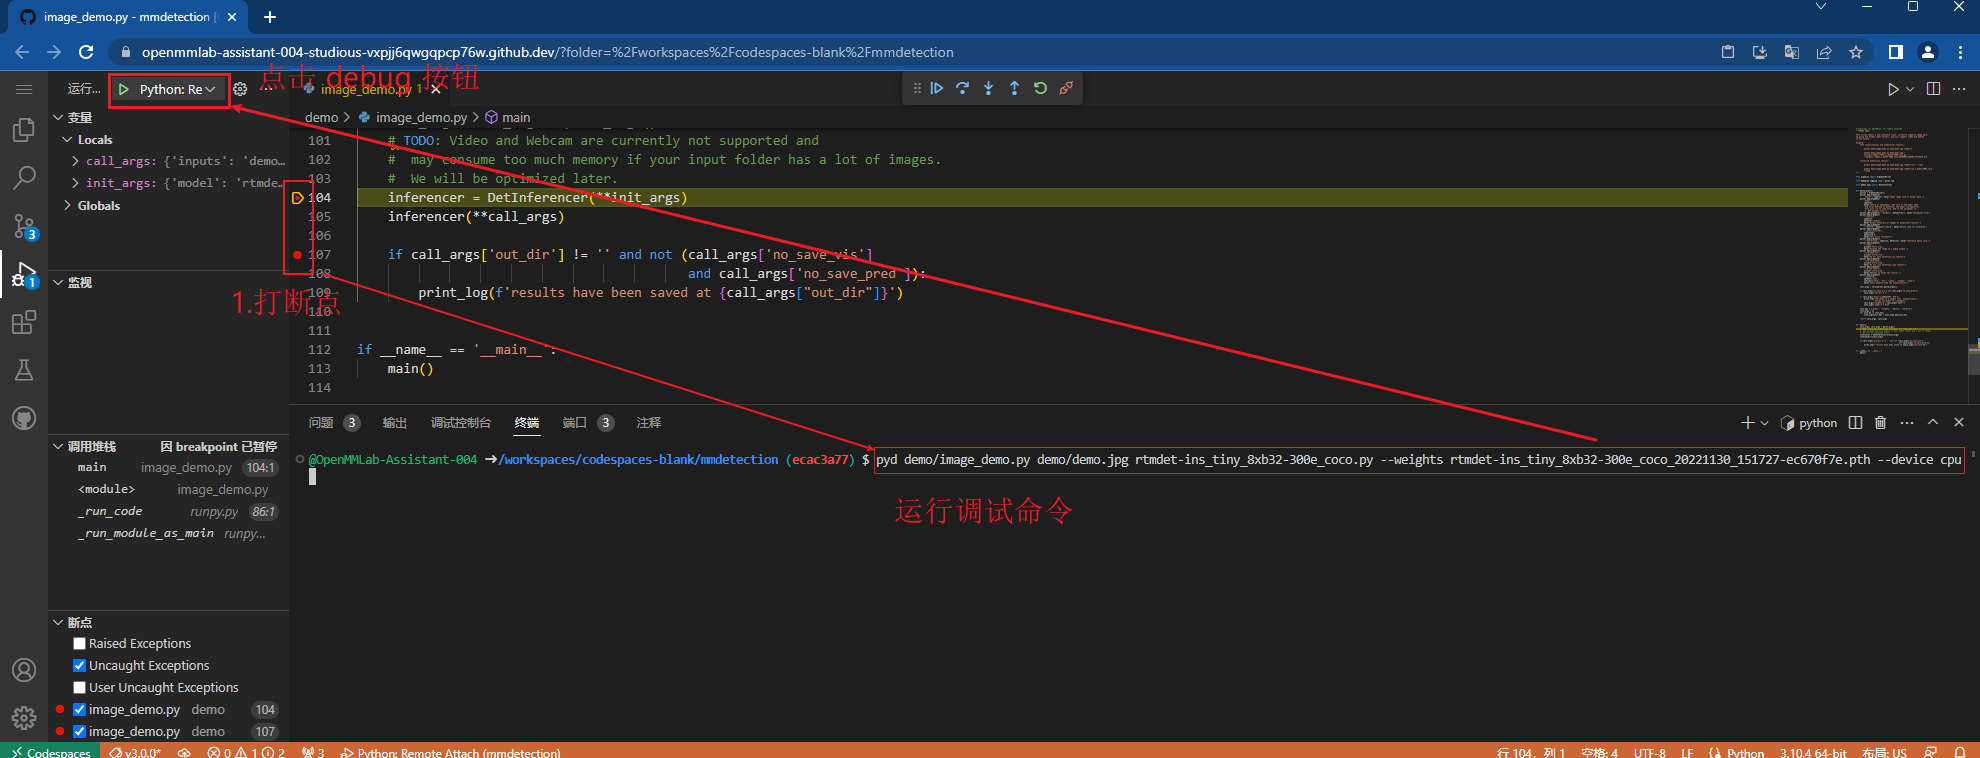
pyd demo/image_demo.py demo/demo.jpg rtmdet-ins_tiny_8xb32-300e_coco.py --weights rtmdet-ins_tiny_8xb32-300e_coco_20221130_151727-ec670f7e.pth --device cpu
# 原始命令是 python,只需要将 python 换成 pyd 就能在 vscode 中进行 debug 了。
# python demo/image_demo.py demo/demo.jpg rtmdet-ins_tiny_8xb32-300e_coco.py --weights rtmdet-ins_tiny_8xb32-300e_coco_20221130_151727-ec670f7e.pth --device cpu

4. pre-commit 运行代码审查

我们在 Windows 环境 powershell 上运行 pre-commit run --all-files经常报错,这时候我们可以使用 Github CodeSpaces 环境修 pre-commit run --all-files 代码审查的问题了。

在 mmdetection 路径下安装 pre-commit。

cd path/to/mmdetection
pip install pre-commit
pre-commit install

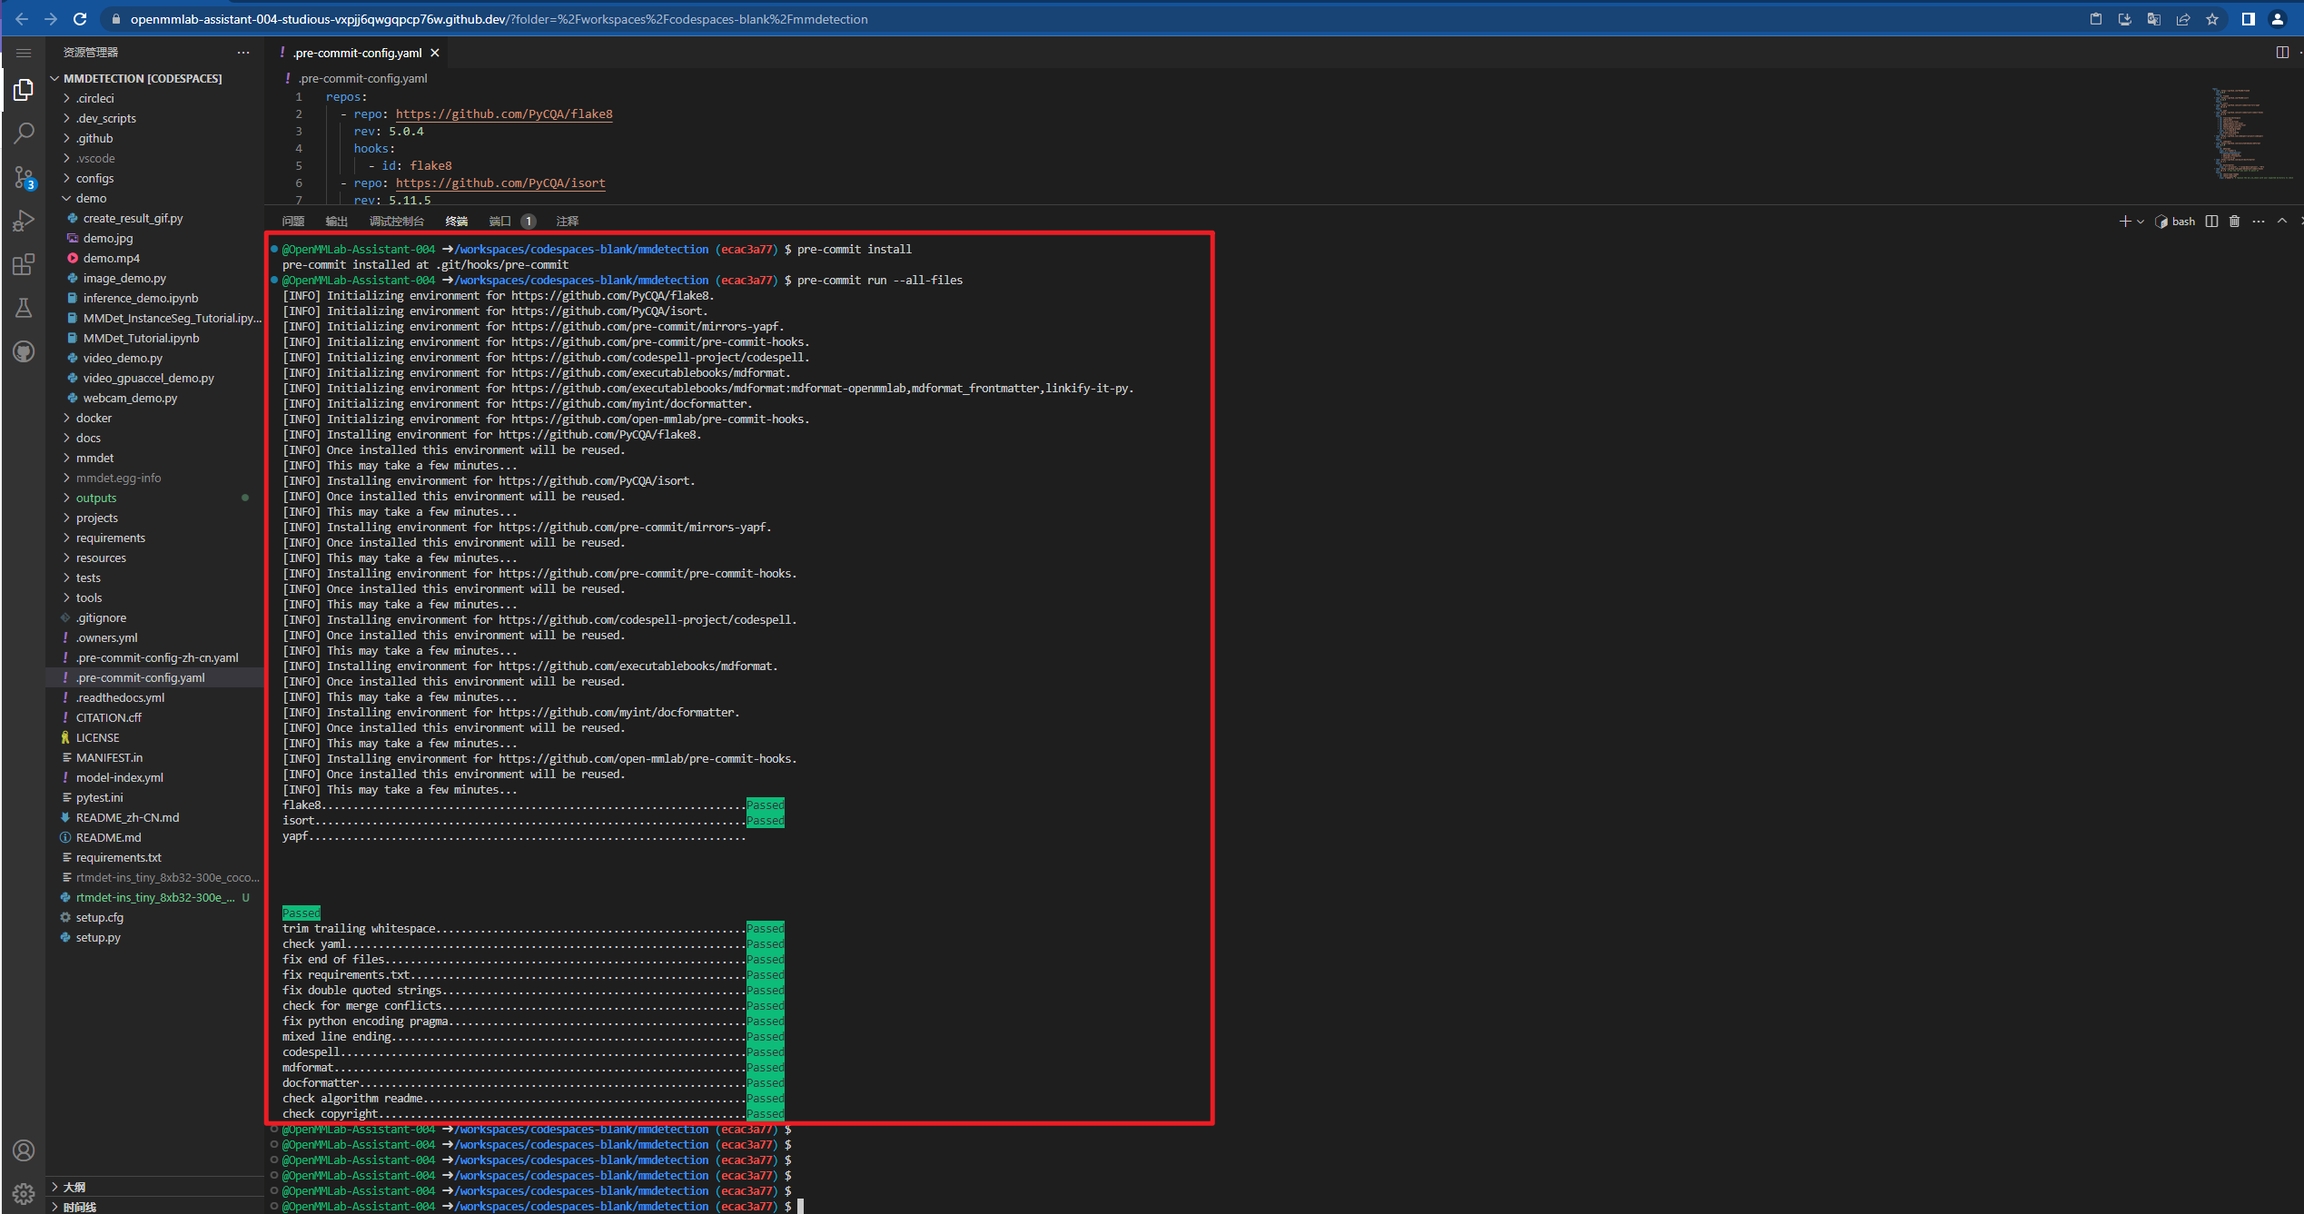
对 mmdetection 整个仓库进行代码格式审查。

pre-commit run --all-files

我们可以看到 pre-commit 基于 flake8、isort、yapf、codespell、mdformat 和 docformatter 的约束对 mmdetection 代码进行了全面的审查,可以看到审查结果是全部通过的。如果是我们自己提 PR 的分支的话,如果不满足代码审查的规范,pre-commit 会自动的对不满足要求的文件进行自动调整,不能自动调整的部分会提示错误。本节仅简单演示在 Github 的云 Linux 环境运行 pre-commit,代码规范审查的详细内容,将在后续的章节中详细介绍。
切换主题
选择深色(Visual Studio)

以下 Debug 方法由 演化而来。

VSCODE Debug 官方文档
https://github.com/codespaces